Firewall - Custom
An invalid custom rule can block remote access to webconfig.
Examples - Limit SSH/Webconfig Access to Specific IP Addresses
The following entries would restrict remote SSH (port 22) an Webconfig (port 81) access to specific IP address that you define (i.e. allow remote login from office, home, datacenter etc.).
# Deny all SSH connections
iptables -I INPUT -p tcp --dport 22 -j DROP
# All connections from address xyz
iptables -I INPUT -p tcp --source 1.2.3.4 --dport 22 -j ACCEPT
iptables -I INPUT -p tcp --source 5.6.7.8 --dport 22 -j ACCEPT
# Deny all webconfig connections
iptables -I INPUT -p tcp --dport 81 -j DROP
# All connections from address xyz
iptables -I INPUT -p tcp --source 1.2.3.4 --dport 81 -j ACCEPT
iptables -I INPUT -p tcp --source 5.6.7.8 --dport 81 -j ACCEPT

Firewall - filtro per protocollo
The Protocol Filter feature is used to block unwanted traffic from your network. The feature is commonly used to make sure employees, students or end users are using their Internet access for its intended productive use. The filter can block dozens of different protocols, including:
- peer-to-peer traffic
- VoIP and Skype
- streaming audio and video
Gateway --> Protocol Filter --> Protocol Filter Configuration
By default, the protocol filter displays the full list of protocols and the status of each one. Since there are well over 100 protocols defined, you can filter the display by type:
- Document Retrieval
- File Types
- Instant Messaging/Chat
- Monitoring
- Networking
- Peer-to-Peer
- Printing
- Remote Access
- Security Protocols
- Streaming Audio
- Streaming Video
- Time Synchronization
- Version Control
- Video Games
- VoIP
- Worm/Virus
At any point, you can click on Block or Unblock to set your Protocol Filter policy for your network. When blocked, all access to and from your network will be blocked by the ClearOS gateway.

Bypass
In some circumstances, you may want to allow specific systems to bypass the protocol filter system. For example, you may want to block voice-over-IP (VoIP) traffic for your entire network, except for the dedicated VoIP/PBX server. In these circumstances, you can add IP addresses to the protocol filter bypass configuration:
- Click on the Bypass
- Specify a Nickname (for example, voip_server) and the IP address
- Click on Add
Firewall - Proxy Server Autodetection
You will find yourself at the ClearOS command prompt.
This howto describes how to configure web proxy auto-detection on ClearOS. The proxy and content filter can be configured in two different mode:
- Transparent mode
- Non-transparent mode
When the proxy is running in transparent mode, no changes are required for web browsers using your ClearOS gateway. However, it is not possible to proxy secure/SSL connection in this mode, nor is it possible to use user authentication to gain access to the web. These limitations do not exist when running the proxy server in non-transparent mode. However, it is now necessary to configure proxy server settings for web browsers using your ClearOS gateway. Fortunately, it is possible to configure proxy server auto-detection. Read on!
Network Configuration
Most web browsers are configured to automatically look for proxy server settings. Before going to its first page, the web browser will attempt to download the proxy server settings file from http://wpad.example.lan The example.lan domain name is typically automatically set via your DHCP server settings. It can also be set manually in your network settings.
The next step is to add the DNS record for wpad.example.lan. If you are using the ClearOS Local DNS Server for your network, then go to Network Settings Local DNS Server in the web-based administration tool. Add wpad.example.lan as a new alias for the IP address of your ClearOS system.
As a sanity check, you can try going to http://wpad.example.lan:82/index.php in your web browser. If you do not see a login screen, then double check your DNS server setup.
As an additional sanity check, go to http://wpad:82/index.php in your web browser. If you do not see a login screen, then make sure your client operating system is configured with the default domain example.lan. If you are using the DHCP server for configuring the default domain, check those settings too.
WPAD - Proxy Configuration File
Now it's time to create the wpad.dat file for your ClearOS system. A very basic example is as follows:
function FindProxyForURL(url, host)
{
return "PROXY 192.168.1.1:8080";
}
The wpad.dat file should go into the /var/webconfig/htdocs on the ClearOS system. As a sanity check, you should see a plain file or a download button when you go to http://example.lan:82/wpad.dat in your web browser.
Finishing Off
Fire up the web proxy from the Gateway Proxy and Filtering Proxy Server page. Try running the proxy with:
- Transparent mode disabled
- Content filter enabled
As yet another sanity check, go to Google and type in some naughty words. If all goes well, the content filter block page will appear!
Advanced Options
If you want to perform some more advanced functions, here are some code snippets to start you off. Check the links at the bottom of the page for more information.
The following is useful when applying exceptions for internal websites - forcing them to go direct rather than through the proxy server.
if (isInNet(host, "192.168.1.0", "255.255.255.0")) { return "DIRECT"; }
Troubleshooting
If you have Windows Servers perfoming DNS on your network, you will need to add wpad.example.lan to that DNS server. You may then run into a problem with EventID 6268 and the global query blocklist preventing modification of the wpad host name. To fix the issue do the following:
To allow WPAD entries to be returned, remove the WPAD entry from the blocklist by using these steps:
- Open the Registry Editor and navigate to HKEY_LOCAL_MACHINE\SYSTEM\CurrentControlSet\Services\DNS\Parameters
- Double-click on the GlobalQueryBlockList value to open the editor.
- Highlight the wpad entry and press the delete key
- Click 'OK' and 'OK' again to return to the main window
- Restart the 'DNS Server' service
Important: By default, a wpad and isatap value will be present. Do not delete the isatap value.
Firewall - Non-transparent Proxy and Content Filter Bypass
If you are using the proxy server (squid) or content filter (dansguardian) in non-transparent mode you may come across some sites that just do not work because of some weird chaining, authentication, or port manipulation. This howto can help address and resolve these issues. This can often be the case for instance with Sharepoint or Outlook Web Access (OWA).
Technical Explanation
The web proxy bypass section basically creates firewall rules that intercept listed items while they flow across the firewall and pipe them directly to the site. For transparent mode content filtration and proxy, this means that the packets are snatched before they are redirected to the proxy (3128) or the content filter (8080).
Since non-transparent use of the content filter or the proxy server requires setting the client to push web traffic to the server directly rather than across it, the firewall cannot grab any such packet and manipulate its flow. Moreover, web request packets and proxy web request packets look very different, so even if it could it wouldn't work.
The answer to this problem lies in using both the client that is specifically using the proxy and adding the exception there in addition to the web proxy bypass.
Setup
Configure the site you want bypassed in the web proxy bypass section of the the gateway. For servers running ClearOS as their gateway, this is done here: Gateway » Proxy and Filtering » Web Proxy » Web Site Bypass. If ClearOS is not your Firewall/Gateway, simply allow all clients on the local network to egress to that site.
In the Web Proxy Bypass, specify an name (no spaces or special characters, hyphens and underscores are ok). Add either the Domain Name, IP Address, or CIDR of the site. CIDR is recommended. Click 'Add'.
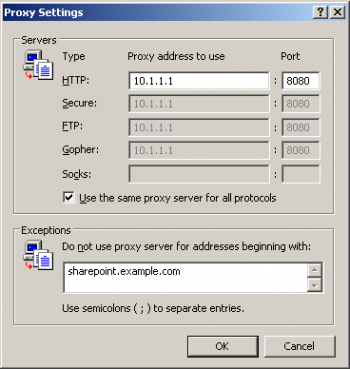
For this example, we will use the Nickname 'Sharepoint' and the Domain/IP of 'sharepoint.example.com'.

Next, configure the client to override the proxy setting for that site.
Windows Registry Setting
You can push this setting out to your Windows workstations using this registry setting example:
Windows Registry Editor Version 5.00
[HKEY_CURRENT_USER\Software\Microsoft\Windows\CurrentVersion\Internet Settings]
"ProxyOverride"="sharepoint.example.com;
Create a text file. Copy the code above and paste it into the text file. Save the changes. Rename the text file to something like 'webbypass.reg'. Double click to add to the local machine.
Manipulation of Windows registry entries can be dangerous. This registry entries has not been tested on all versions of Windows at this time, use at your discretion.
Windows XP, and Windows 2003 Server
Click on Start » Control Panel » Internet Options.
Then find the Exemption list Connections »LAN Settings…»Advanced.
Add any number of sites to this list but separate your entries with a semicolon (;).
Mac OSX
Navigate to the network settings. Apple icon (upper left)»Show All»Internet & Wireless»Network
Find the proxy settings Advanced»Proxies»Bypass proxy settings for these Hosts & Domains.
Insert the Hostname, IP address, or CIDR of the site separated by commas (,).

Firewall - DMZ
In ClearOS, a DMZ interface is for managing a block of public Internet IP addresses. If you do not have a block of public IP addresses, then use the Hot LAN role of your IP Settings. A typical DMZ setup looks like:
- WAN: An IP addresses for connecting to the Internet
- LAN: A private network on 192.168.x.x
- DMZ: A block of Internet IPs (e.g from 216.138.245.17 to 216.138.245.31)
Webconfig has a DMZ firewall configuration page to manage firewall policies on the DMZ network.
Firewall - Hot LAN
Hot LAN (or “Hotspot Mode”) allows you to create a separate LAN network for untrusted systems. Typically, a Hot LAN is used for:
- Servers open to the Internet (web server, mail server)
- Guest networks
- Wireless networks
A Hot LAN is able to access the Internet, but is not able to access any systems on a LAN. As an example, a Hot LAN can be configured in an office meeting room used by non-employees. Users in the meeting room could access the Internet and each other, but not the LAN used by company employees.
The firewall port forwarding page in webconfig is used to forward ports to both LANs and Hot LANs.
Firewall - OpenVPN
To configure the Windows OpenVPN client:
- Download and install the client software – download page
- Login to webconfig as the OpenVPN user (not the root/administrator account!)
- Go to the Directory My Account Security and Keys in the menu system. You will need to download the certificate, certificate authority, key and the OpenVPN configuration file into the configuration directory on your Windows system.
Firewall - PPTP VPN
The PPTP server is a secure and cost effective way to provide road warrior VPN connectivity. The PPTP VPN client is built-in to Windows 2000, XP, Vista and 7. No extra software is required and ClearOS provides full password and data encryption.
Local IP and Remote IP
You must select a range of LAN IP addresses for the PPTP VPN connections. This range should be on the same network as your local area network. By default, the DHCP Server on ClearOS only uses IP addresses above x.x.x.100. All addresses below this number are reserved for static use. We strongly suggest you use this sub-100 static range for PPTP.
Encryption Key Size
Most PPTP VPN clients support the stronger 128-bit encryption key. However, some VPN clients (notably handheld computers and mobile phones) may only support 40-bit encryption. Change the encryption key size to meet your needs.
Domain
The default Internet domain used by the PPTP client.
WINS Server
The Microsoft Networking WINS server used by the PPTP client. Depending on your network configuration, you may need to specify the WINS settings in VPN client configuration.
DNS Server
The DNS server used by the PPTP client.
Usernames and Passwords
PPTP users must have a valid account with the PPTP option enabled. See the User Manager for more information.
Configuring Microsoft Windows
Configuring Windows XP
The PPTP client is built-in to Windows XP.
- Go to the Control Panel.
- Click on Network Internet Connections (this step may not be necessary).
- Click on Network Connections.
- Click on Create a New Connection to start the configuration wizard
- Select connect to the network at my workplace.
- Select Virtual Private Network connection.
- Add a connection name, and dial settings, and hostname.
- Click on the Properties button (or right-click on the new connection, and select Properties from the menu.
- Select the Security
- Make sure Require data encryption is selected.
- Select the Networking tab.
- From the Type of VPN drop box, select PPTP VPN.
PPTP Passthrough
PPTP requires special software when passing through firewalls. This feature is included with ClearOS. However, there is one important restriction for PPTP pass-through mode: a PPTP server must not be running on the same gateway that has PPTP connections crossing it.
If you run a PPTP server on a ClearOS gateway, you will not be able to have people from behind the same gateway make reliable outbound PPTP connections to other servers. By default, the firewall will automatically disable PPTP pass-through when the firewall already allows connections to a PPTP server. You will see warning messages in the web-based configuration about these configuration issues.
Depending on the circumstances, you may be able to have both PPTP pass-through and a PPTP server running at the same time. To do this, you need to override the firewall behavior noted in the previous paragraph. In the /etc/firewall file, add the following line:
PPTP_PASSTHROUGH_FORCE=“yes”
Then restart the firewall with the following command:
/sbin/service firewall restart
Troubleshooting
Error 619, PPTP and Firewalls
PPTP requires special software when passing through gateways/firewalls. If you are having trouble connecting to a PPTP server, make sure any gateways/firewalls between your desktop and the ClearOS server support PPTP passthrough mode. If you see the following in the /var/log/messages log file on the ClearOS system, then it is likely a PPTP passthrough issue on the client side of the connection:
PTY read or GRE write failed
You can view log files via the web-based administration tool – go to Reports Logs in the menu.
Another quick way to diagnose the issue is by connecting to the PPTP server while connected directly to the local network. With a direct connection to the ClearOS PPTP server, you can eliminate the potential for the PPTP passthrough issue.
PPTP Passthrough
If you are connecting a desktop from behind a ClearOS gateway to a remote PPTP server, then you need to have PPTP passthrough software installed and enabled on the firewall.
However, we do not recommend running PPTP Passthrough and a PPTP server simultaneously. By default, the ClearOS gateway will automatically disable PPTP Passthrough when the firewall is configured to allow PPTP server connections. If you would like to run PPTP Passthrough and a PPTP server simultaneously, see above.
Two PPTP Connections to the Same Server
The PPTP protocol does not allow two VPN connections from the same remote IP address. In other words, if you have two people behind a gateway (for example, ClearOS) connecting to the same PPTP server, then the connection should fail. Note: it is fine to have two people behind a gateway connecting to different PPTP servers.
Some PPTP servers and gateways (including ClearOS) do make an exception for this shortcoming. However, some PPTP servers may strictly follow the standard below:
The PPTP RFC specifies in section 3.1.3 that there may only be one control channel connection between two systems. This should mean that you can only masquerade one PPTP session at a time with a given remote server, but in practice the MS implementation of PPTP does not enforce this, at least not as of NT 4.0 Service Pack 4. If the PPTP server you're trying to connect to only permits one connection at a time, it's following the protocol rules properly. Note that this does not affect a masqueraded server, only multiple masqueraded clients attempting to contact the same remote server.
Firewall - DynamicVPN
Dynamic VPN and ClearSDN
The ClearSDN Dynamic VPN enhances the IPsec VPN experience with: i) support for dynamic IPs ii) automatic re-connections iii) easier and less error prone configuration.
Configuring Connections with Dynamic VPN
Dynamic VPN support not only simplifies configuration, but also improves the up-time of the connections. In order to create a connection between to systems, you need to configure both ClearOS systems.
If you are configuring a VPN connection between your local gateway and a remote gateway, then configure the remote gateway first. Once the VPN is started on the remote system it will only be accessible when the VPN connection is up.
From the webconfig tool, click on Create in the Dynamic VPN Connections box. You need to:
- Select the target system name from the list
- Type in a pre-shared secret (password)
On the first connection or when an IP address changes, it may take a minute for the connection to synchronize.
The two LAN networks at either end of the VPN connection must not overlap!
Configuring Unmanaged VPN Connections
The unmanaged VPN feature is not maintained by ClearCenter. We do not recommend using this feature in a production environment.
If you are using static IP addresses, you can also configure unmanaged VPN connections. Please keep in mind, unmanaged VPNs have the following limitations:
- 4 tunnels are created per VPN connection instead of 1 single tunnel used in managed VPN
- Unmanaged VPNs do not properly handle routing in a multi-WAN environment
- Connections are not monitored as they are in managed VPN, so manual corrective action will be required for VPN outages
Select Headquarters and Satellite
Pick one server to be the “Headquarters” and the other to be the “Satellite”. This is just a naming convention – pick a convention and stick with it!
Gather Network Information
You must gather some network information for the IPsec server configuration, namely: the IP address, next hop (gateway), and network for both sides of the network. Make sure these settings are correct – you will save many hours of pain and frustration. The information for the local ClearOS system is shown when you start to configure an unmanaged VPN connection.
Select a Connection Name and Pre-Shared Secret
Once you have your network settings in hand, enter the information on both ends of the VPN connection. Enter a simple nickname for the connection along with a strong pre-shared secret. When configuring the other end of the VPN connection, do not be tempted to swap the Headquarters and Satellite information! The configuration screens on both ends of the connection will look exactly the same.
Sanity Checking
Start the IPsec server on both ends of the connection. Do not use Windows Network Networking to verify the VPN. Instead, make sure you can ping from:
- gateway to gateway
- gateway to remote PC
- remote PC to gateway
- remote PC to remote PC
If the connection fails, double check your network settings and restart your firewall.
Configuration for Road Warriors
The web-based administration tool does not support Road Warrior connections or interoperability with other IPsec servers. The software is capable of these configurations (including X.509 solutions), however, you must manually configure these connection types - a non-trivial task.
For road warriors/telecommuters, we suggest using the 128-bit encrypted PPTP VPN or more modern and certificated base OpenVPN. This option is not only more cost effective, but also easier to configure.
Interoperability
The IPsec protocol is an industry standard, but one with many of loose ends. This means that other IPsec servers may not be able to connect to a ClearOS IPsec server. If you are familiar with the command line environment, you may be able to successfully connect a ClearOS system to a third party system. You can find more information in the OpenSwan Interoperability Documentation.
Troubleshooting
- Make sure your firewall allows incoming connections for IPsec traffic
- The IPsec protocol does not pass through NAT-based routers. In other words, if your external IP address is 192.168.x.x or 10.x.x.x, then your system is behind a NAT-based router.